Creating a New Block Definition[ | ]
1. To add a block to your mod, enter a name for it and click ‘Create’. Your new block will now appear in the blocks list.

2. Click ‘Edit’ next to the block’s name to edit its properties
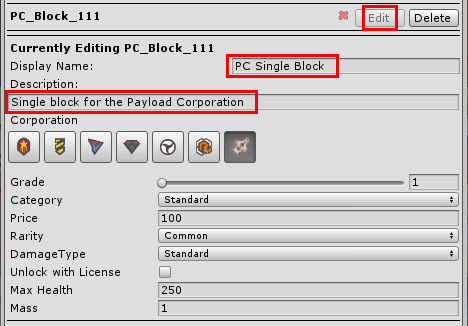
3. Fill in the data fields
- Display Name: This is the name that appears in the inventory
- Description: This appears under the name of the block in the inventory
- Corporation: Select from one of the 6 vanilla corporations (custom corporations will become available if you have followed the How to Make a Corporation tutorial, which is coming soon)
- Grade: In terms of campaign progression, where does this block unlock? GSO grade 4 or Venture grade 2 for example
- Price: The cost of buying this block from the shop
- Rarity: How often this block appears in crates
- Max Health: How much health or hitpoints this block has
- Mass: How much the block weighs
4. Depending on what type of block you are creating, select the appropriate module(s) from the list of templates then click ‘Create Physical Prefab and Block JSON’
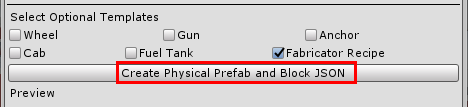
This creates the Physical Prefab, which is where you will add meshes to your block, and the Block JSON, which is a text file that defines the block properties. The button will be replaced by 2 new buttons to edit either the prefab or the JSON.
This guide explains the process of creating standard blocks. If you are creating blocks with additional functionality such as a wheel or weapon, refer to the block module guide;
Editing the Physical Prefab[ | ]
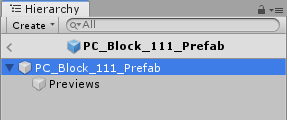
1. Click ‘Edit Physical Prefab’ to open the prefab in the Unity scene view.
You will need to provide a mesh for your block, which can be exported in .fbx format from your chosen 3D modelling software.
An example model can be found in the “Assets/PayloadStudios/TerraTechModTool/SampleAssets” folder. You can import this into your 3D software to use as reference for scale and orientation.
Your block model will need to be UV mapped to match the textures of the corporation to which it will belong. Textures for each of the TerraTech corporations can be found in the “Assets\PayloadStudios\TerraTechModTool\SampleAssets\Skins” folder. Use the ALBEDO texture from the appropriate corporation as reference when UV mapping. If you are creating your own corporation you will need to UV map your block model using your custom corporation’s textures.
Ensure the model’s scale is correct (1m cube for a 1x1x1 block) and transforms have been reset. In Unity the Y-axis points upwards and the Z-axis forwards. This may differ in your 3D software, in which case you will need to rotate the model or pivot into the correct orientation before export.
If you are using Blender, .blend files containing example block models can be found in TerraTech Modding Resources, in the Model Examples folder.
A guide explaining how to export block models from Blender can be found here;
Exporting Block Models from Blender
2. Selecting your block prefab in the Hierarchy window will open its properties in the Inspector window. If you don’t have these windows open, you can open them from Window > General on the top bar
3. In the inspector, you can assign your mesh to the block. This can be done by pressing the small circle by the mesh field or by dragging and dropping a mesh from the ‘Project’ window into the mesh slot.
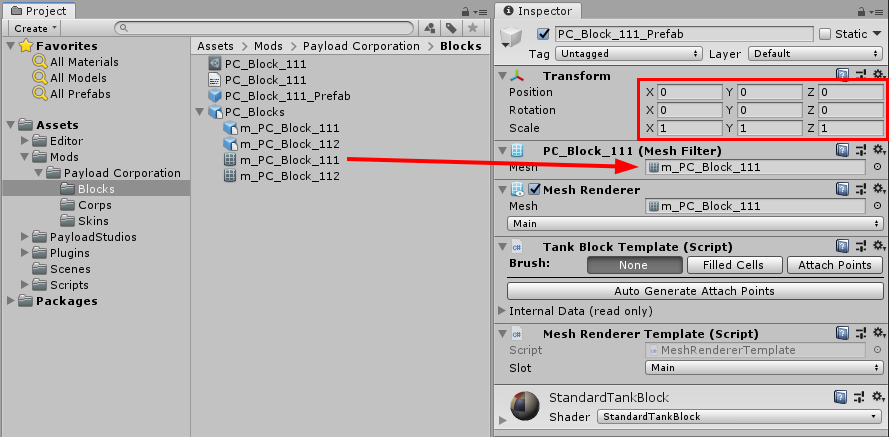
Do not adjust the prefab transforms at the top of the inspector window as this will cause unpredictable block behaviour in game.
Position and Rotation must be 0 and Scale must be 1 in all axes. If your mesh is not appearing as you expect in Unity, any changes to scale or orientation must be done in your 3D modelling software before export.
4. Don’t be tempted to edit the material in the Inspector, as these settings will be overridden on export and textures will be automatically applied depending on the corporation you have selected in the mod tool.
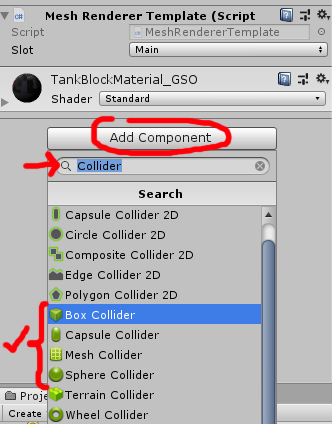
Adding Colliders[ | ]
Every block in the game needs colliders - shapes that tell the game how it collides with other blocks and the terrain. Colliders need to be as simple as possible as the more complex they are the more they affect performance.
1. Select “Add Component” in the Inspector window and type in “Collider”
2. Choose from “Box Collider”, “Capsule Collider”, “Sphere Collider” or “Mesh Collider”. Choose the shape that best fits your block design.
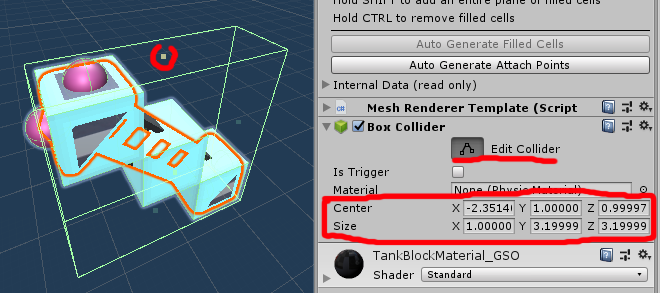
3. For primitive colliders - box, capsule and sphere, you will now see a green wire frame around your block. You can edit the collider using the component settings or by clicking “Edit Collider” and dragging the points shown in the Scene view.
4. If none of the primitive colliders are suitable you can use a convex mesh collider. You will need to make this in your 3D modelling software and export it with the block model. It should be a simple representation of your block shape with as few faces as possible. Ensure the orientation matches your block and the transforms have been reset. Drag the mesh into the ‘Mesh’ slot of the mesh collider component and ensure ‘Convex’ is checked.’
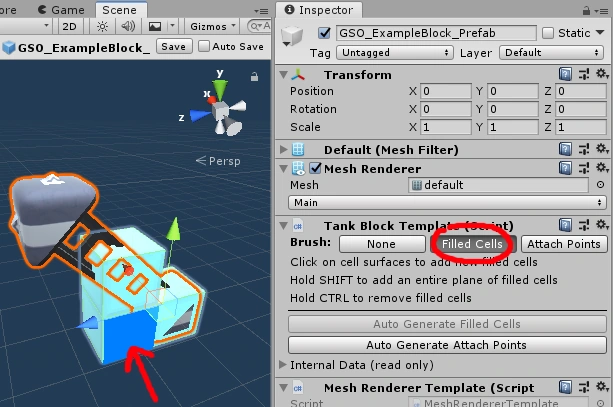
Filled Cells & Attach Points[ | ]
1. In the brush selection, choose “Filled Cells”.
2. Use your mouse to click on filled cell surfaces in the Scene view. This will extend that surface outwards by one block.
3. To extend an entire layer, hold the shift key.
4. To remove filled cells, hold the ctrl key. (You can combine ctrl and shift)
5. Keep tweaking until you have a set of cubes that best represents the space that your block occupies. This is used to determine how the block fits into a tech.
6. Once your filled cells are all in place, select “Attach Points” in the brush selection.
7. Click on a surface to add an attach point, represented by a pink sphere.
8. Click on a pick attach point sphere to remove it.
9. These markers indicate where your block can be attached to other blocks, and are normally indicated by a small square pyramid on the block’s mesh.
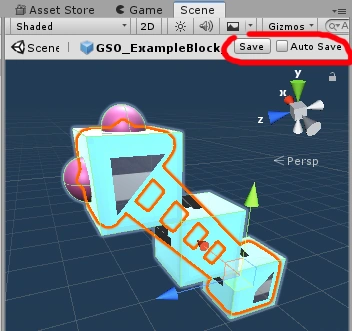
10. When you are happy with the filled cells and attach points, press Ctrl + S or click on the “Save” button in the Scene view. You can tick “Auto Save” to avoid having to remember to save every time.
You can also generate APs automatically by clicking ‘Auto Generate Attach Points’ This will try to create attach points based on the physical mesh. It searches the mesh for square based pyramids of a certain size and places attach points there if there is a filled cell underneath.
This has to have filled cells in place to work, as an attach point cannot be separate from a filled cell.
Advanced JSON Properties[ | ]
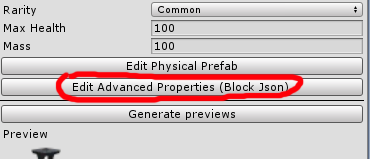
1. Advanced block features are available via the JSON file associated with each custom block. This is a text file that defines block properties, and can be edited by clicking on ‘Edit Advanced Properties (Block Json)’
2. By default your block JSON will contain a crafting recipe. You can define the list of ingredients by editing the JSON file;
| {
"Recipe": "plumbiaingot, plumbiaingot, plubonicgreebles" } |
The available ingredients are listed in Appendix 4.1, and the recipe is case insensitive.
Export[ | ]
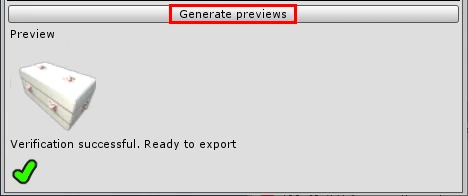
1. Click the ‘Generate Previews’ button. This will create the preview image that will appear in the inventory.
If your preview image comes out too zoomed in or zoomed out, you can click on “Main Camera” in the “Hierarchy” tab and move the camera backwards or forwards using Unity Controls.
2. If you see a red cross you will need to fix any errors listed.
3. If you see a green tick your block is now ready to be exported and tested in game
Refer to the Official Mod Support guide for details of how to export locally for testing, and how to publish your mod on the Steam Workshop.
Appendix[ | ]
| Wood | RoditeOre | HardenedTitanic | CycloneJet |
| FibronChunk | RoditeCapsule | BlastCaps | PlasmaEmitter |
| RubberJelly | IgniteShard | FuelInjector | ZeroPointSplitter |
| RubberBrick | IgnianCrystal | AcidElectrode | MotherBrain |
| PlumbiteOre | CelestiteShard | HeatCoil | DervishGel |
| PlumbiaIngot | CelestianCrystal | HardLightDrive | CoffmanCell |
| TitaniteOre | EruditeShard | SensoryTransmitter | ThermoJet |
| TitaniaIngot | ErudianCrystal | RuggedFiblar | GluonBeam |
| CarbiteOre | LuxiteShard | PlubonicAlloy | SeedAI |
| CarbiusBrick | LuxianCrystal | TitanicAlloy | ProximaDark |
| OleiteJelly | FibrePlating | Z4Explosives | |
| OlasticBrick | PlubonicGreebles | IonPulseCell |